Shaper parts and progress

Re: Shaper parts and progress

Postby ScrapMetal » Sat Mar 10, 2012 3:58 pm

To quote Gomer Pyle, "Surprise, surprise, surprise..." :?

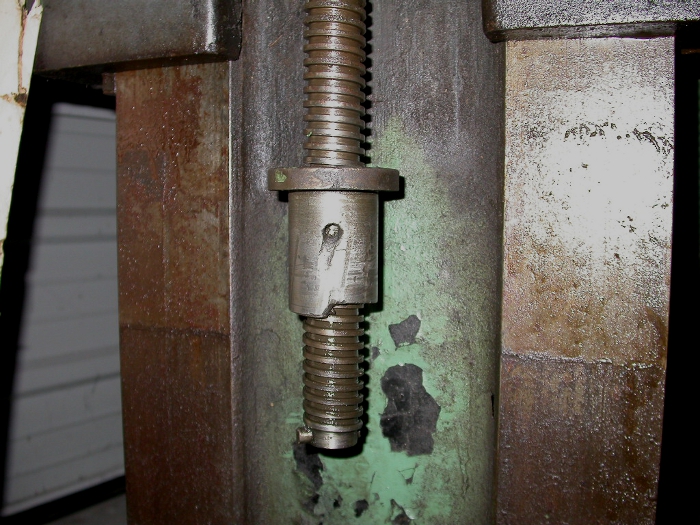
With a liberal application of a jack I was able to get the horizontal slide moving vertically. I'm not sure of what I was expecting to see but this was definitely not it.

Image

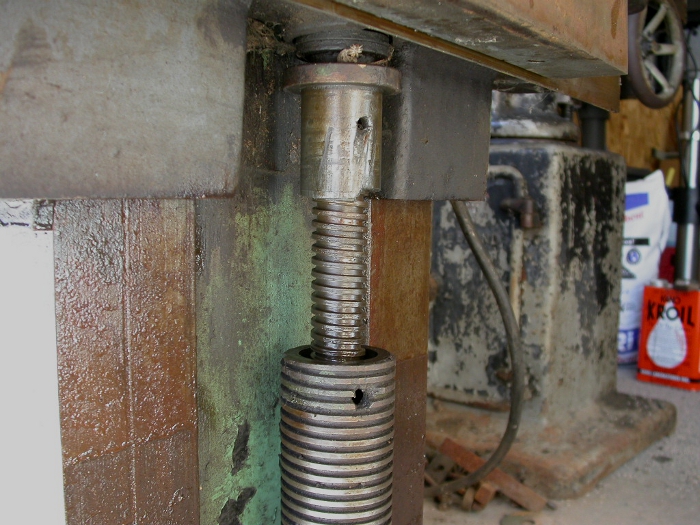
The inner screw hangs freely and does not come in contact with anything in the surrounding acme "tube" so it must engage somewhere down in the base. Also, notice the nice deep gouge on the left "way". Bet that didn't go smoothly. :|

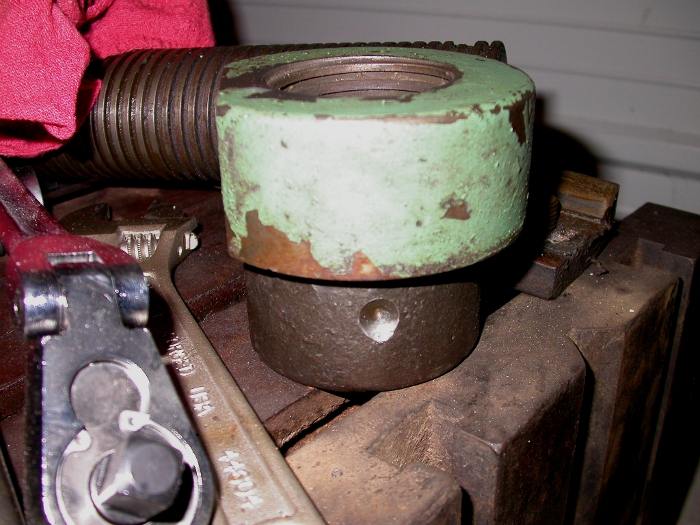
I then, by hand, backed the outer "tube" out of the base. At the moment it appears to be free-floating as well, although not by design.

Image

Image

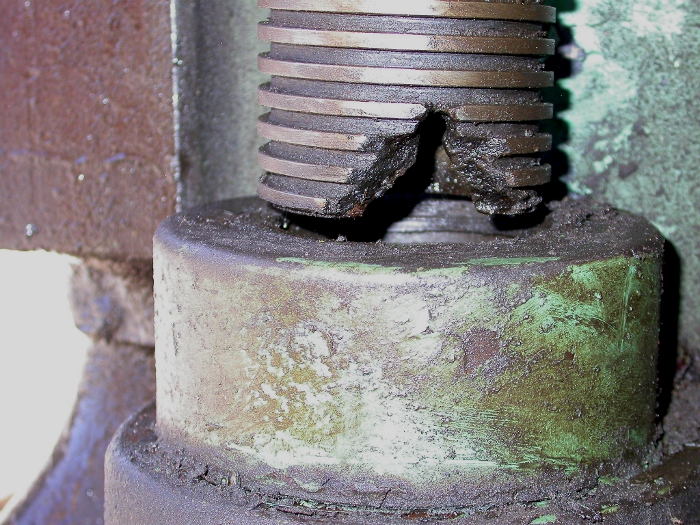
It would appear though that at one point there was another set screw (full-dog?) down near the base but I have no clue as to what it may have been "pinned" to.

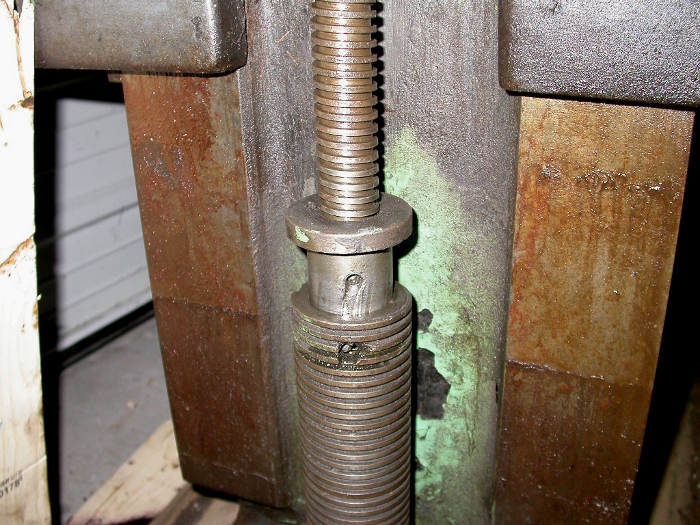
The base/nut thing can be wiggled around some but seems to be held in by something out of sight. It can't be spun as the back side up against the shaper has a flat section so that it can butt up against the shaper.

I must still be missing a piece of the puzzle as I can't quite wrap my mind around how this mechanism is actually supposed to function. I'm thinking that the "key" is whatever the outer "tube" was pinned to in the base.

Deep in thought (or as deep as I get these days ;) ),

-Ron
Wells-Index 860 Mill
South Bend 11" Lathe
Queen City Shaper
User avatar
ScrapMetal
Site Admin
 
Posts: 225
Joined: Thu Feb 02, 2012 3:39 am

Re: Shaper parts and progress

Postby Turbinedoctor » Sun Mar 18, 2012 9:01 pm

Pretty nasty looking gouge there. Hope it doesn't interfere with the operation. Any new progress?
Durwood
Turbinedoctor
 
Posts: 65
Joined: Thu Feb 02, 2012 5:33 am

Re: Shaper parts and progress

Postby ScrapMetal » Mon Mar 19, 2012 12:36 am

Funny you should ask. ;) I've been working on it as time allows and it has been a learning experience to say the least. I've learned quite a bit about my shaper and have gotten some "close personal time" with it.

I was able to get the horizontal slide moving vertically using a jack and some 2"x4" lumber. Then I discovered that the nut was being held in by two set screws. I had to finally drill one out, that was a lot of fun.

Image

Tony suggested that what I thought was a "flange" holding the hanging screw was actually the top nut. When this turned out to be true all the pieces kind of fell into place. The top nut "flange" had just been wedged up in the horizontal slide. With a little judicious prying and turning it popped out.

Image

That "pulled everything together" because it now meant that it wasn't missing any pieces. I have everything part to make it operational (for the most part ;) ). I drew up what the final mechanism should look like:

Image

and in real life:
Image

Now the only thing is what to do with the damaged outer sleeve? Well, after much consideration it looks like I'm going to try and make a new one on the lathe. Once again it looks like Tony has come to the rescue as he says he has some 4120(?) steel tube that has a 3" outer diameter and a 1.5" inner diameter. If he has it available and is so kind to hand it off to the guys with the big brown truck I'll be on my way. Got some learning to do though before I'm ready to cut "square" threads.

That's about where I'm at,

-Ron
Wells-Index 860 Mill
South Bend 11" Lathe
Queen City Shaper
User avatar
ScrapMetal
Site Admin
 
Posts: 225
Joined: Thu Feb 02, 2012 3:39 am

Re: Shaper parts and progress

Postby Turbinedoctor » Tue Mar 20, 2012 5:07 pm

Thanks for the update. Glad Tony could shed some light on how it all works together. I understand the smaller screw going up and down inside the larger one but dont see much room for the larger one to move up or down. Why would the be two, one fine and the other course?
Durwood
Turbinedoctor
 
Posts: 65
Joined: Thu Feb 02, 2012 5:33 am

Re: Shaper parts and progress

Postby rleete » Wed Mar 21, 2012 6:06 am

I still think that outer screw could be welded. Find a garage that does welding repairs. Just fill in the space, and use a file/grinder to bring it back into shape.

Of course, if you want to make a screw, it's not that difficult. You need to know if it's a single thread or not. Cut using a parting tool.
Homier Speedway 7x14 lathe
Grizzly G8689 Mini Mill
HF 4x6 Bandsaw, bench grinder and more
Years of experience wrecking things
rleete
 
Posts: 62
Joined: Thu Feb 02, 2012 5:22 am
Location: Rochester, NY

Re: Shaper parts and progress

Postby ScrapMetal » Wed Mar 21, 2012 2:50 pm

Turbinedoctor wrote:Thanks for the update. Glad Tony could shed some light on how it all works together. I understand the smaller screw going up and down inside the larger one but dont see much room for the larger one to move up or down. Why would the be two, one fine and the other course?


I find that a little odd as well. The outer sleeve will maybe have five or so inches of travel until the smaller screw does all the rest. I hadn't really considered that they were a different pitch. While they may be it would only be a slight difference and it would only come into play when one of the screws was already at it's max distance. It might just have come down to whatever was most cost-efficient to do at the time it was designed - we can blame the "bean counters". :D

rleete wrote:I still think that outer screw could be welded. Find a garage that does welding repairs. Just fill in the space, and use a file/grinder to bring it back into shape.

Of course, if you want to make a screw, it's not that difficult. You need to know if it's a single thread or not. Cut using a parting tool.


Yes, it could be welded up but I still have doubts as to whether the "sleeve" is sound enough where that kind of repair would make it reliable. I don't know just how the damage was done to it and if it has other, less noticeable, cracks and fractures. Once a hunk of iron was welded back in I'm pretty sure it would be a ton of work to get it back to functioning correctly. Since that section would be riding in the nut the threads would have to match very well and would take a little more finesse than a parting tool. On top of that there would be the massive "interrupted" cut while trying to match the lathe timing to the existing threads. I can think of few things that would be a bigger p.i.t.a. All this if I was even able to find a welder competent enough to do the job (I am not at this point) which I have my doubts about as well. If they were to screw it up I'd be mad as all get out and still have to cut a sleeve to replace it.

That's kind of why I'm thinking I can keep the whole job "in house" by cutting a new screw sleeve myself.

I'll keep you guys in the loop as things progress.

Thanks guys,

-Ron
Wells-Index 860 Mill
South Bend 11" Lathe
Queen City Shaper
User avatar
ScrapMetal
Site Admin
 
Posts: 225
Joined: Thu Feb 02, 2012 3:39 am

Previous

Return to Shapers and Planers

Who is online

Users browsing this forum: No registered users and 0 guests

cron