Page 14 of 24

Re: Where are we at?

PostPosted: Thu Aug 30, 2012 2:50 pm
by ScrapMetal
Making some progress! I received the inserts to go in the Aloris #71 parting tool. With a great deal of trepidation :eh: I set the SB up for parting and gave it a shot -

Image

Image

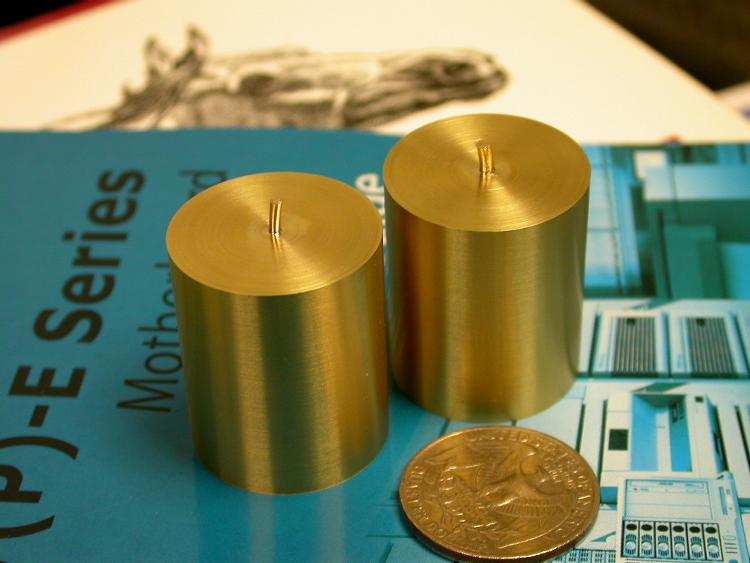
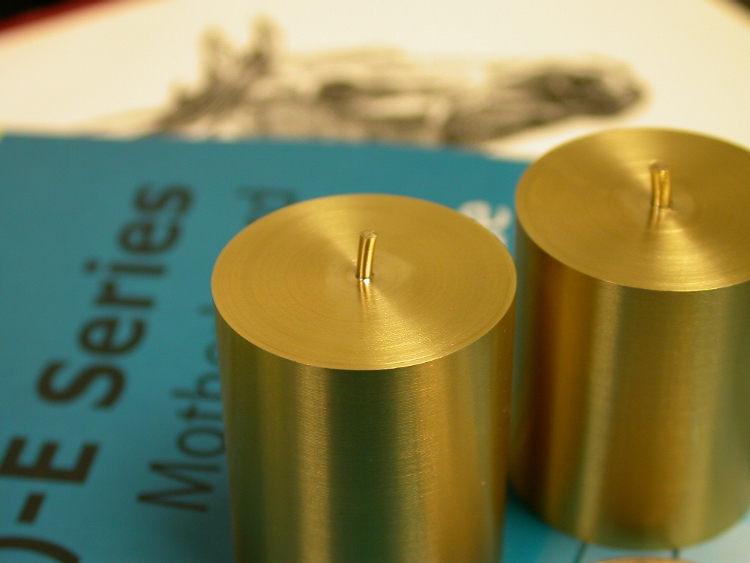
As this was the first time I've ever tried parting with a carbide insert I have to admit I was a bit surprised by how well they came out. These pics are just how they dropped from the lathe, the "nubs" are still on. I was using a "flat" insert which I believe was the cause of the nubs. I understand now why they offer both a left and right angled bits as well. I fed the the cutter by hand but also used a live center in the tailstock to keep everything as rigid as possible.

I had "planned" to get 3 cylinders parted from the round stock I had in the chuck but I initially mis-read (or just forgot) :oops: the plans and planned on making them 1" tall when they were actually to be 1.19" tall. At least I double checked what the proper size should be before I made the first cut. :thumbsup:

Things are gettling back to ("ab-"?) normal around here so I am pretty sure I'll have the rest of the cylinders turned and parted in the next few days then it will be on to the milling, drilling, and boring. How are you doing Rleete? :mrgreen:

-Ron

Re: Where are we at?

PostPosted: Fri Aug 31, 2012 5:40 am
by rleete
Oh, crap. Am I the one holding up the show?

Cylinder covers have been made except for cutting the locating boss on the bottom. I may have to skim them one last time to bring them into size, but my caliper battery died and I just haven't gotten back to it. That's my excuse anyway. I did take some pics of the small holding fixture I made, so I'll get busy and post them next week. Labor day weekend, and we're going away to the annual family reunion, so no shop time for a few days. I have the mailing envelope, so it's just a matter of taking the time to finish up and polish the parts.

Finish looks very good on your parts. One word of advice: your tool tip is slightly off center, which is why your getting the nubs. On a part that size, that's still pretty good. You want to make sure that it isn't under center, or the part may climb up the tool and cause it to knock everything out of whack.

Re: Where are we at?

PostPosted: Sat Sep 01, 2012 2:26 am
by ScrapMetal
Nope, you're not the one holding up the show, you probably still are well ahead of me. :oops:

Thanks for the tip on the cutter being off center. I'll check it but I know that I initially set it "right on". I just figured that the parts just had too much mass for the remaining "center" and twisted off but I will double check.

-Ron

Re: Where are we at?

PostPosted: Sun Sep 02, 2012 4:17 pm
by B34VD
Looking good gentlemen. I just got around to doing some machining this weekend. Been so busy with the wrenching, I haven't had time for it. I made up for it today, I had the chips flying flycutting a torque plate for boring.

Re: Where are we at?

PostPosted: Tue Sep 04, 2012 1:47 pm
by ScrapMetal
B34VD wrote:Looking good gentlemen. I just got around to doing some machining this weekend. Been so busy with the wrenching, I haven't had time for it. I made up for it today, I had the chips flying flycutting a torque plate for boring.


And no pictures? :sob: Shame on you.

-Ron :mrgreen:

Re: Where are we at?

PostPosted: Tue Sep 04, 2012 5:00 pm
by B34VD
Yeah, I know. I was just glad to be able to do some machining that I forgot all about that.

Re: Where are we at?

PostPosted: Tue Sep 04, 2012 5:28 pm
by rleete
Okay, lets' see if this works. Pics, just for you Ron. And I'll type slow, because I know you can't read fast...

I needed to make cylinder caps. Thin round wafers, hard to hold. So, I parted off oversize, about 10 pieces. Then I made an adapter/collet to hold them. It goes as follows:

First, rough it out. Yes, I used the parting tool to rough it. It worked...
Image

Then, bore it out to hold the part. Note the stepped shoulder to hold the part to a consistant depth. Hole must go all the way through, as you'll see later on:
Image

Then we remove some more metal. This is because the chuck has to squeeze the whole thing to hold the part, and the thicker the collet, the more stress on the chuck.

Image

Finally, we slit it along the side (I used the bandsaw), and put a part in. I actually did this in the step above, and then had to turn more off the diameter to get it to close more easily. Now, it's easy to lock the carriage, and face off to size. Keeping the carriage locked means the parts all end up the same.

Image


You'll note that the part sticks out. This is so I can use the parting tool to make the boss without having to remove the part. Once again, lock the carriage, dial in to start cutting, and go to a set dept. Voila, parts all the same.

Re: Where are we at?

PostPosted: Wed Sep 05, 2012 4:51 am
by Turbinedoctor
Ron that is a nice finish on the parting off. I tried parting off with the live center in place and had too much pressure on it and everything got jambed up. Didn't know my lathe could make a noise like that. Still need to practice more with parting off.

Durwood

Re: Where are we at?

PostPosted: Wed Sep 05, 2012 4:53 am
by Turbinedoctor
Rleete, that is a cool idea for holding them, I will keep that in mind for future projects. Thanks for the pictures.

Durwood

Re: Where are we at?

PostPosted: Wed Sep 05, 2012 3:28 pm
by B34VD
Very clever, can you show me again. I didn't catch it all the first time.