Where are we at?

Re: Where are we at?

Postby ScrapMetal » Thu Nov 15, 2012 1:11 am

rleete wrote:Haven't done a thing. They sit on my workbench, mocking me.
I think I'm going to skip the polishing part. That should help, if I don't feel it's such a chore to make them. Polishing is fuss work.

I have to fix the wife's Tracker tonight/tomorrow (replace starter), and get the Miata put away for the winter. Oh, and prime the living room wall. Then I'm free and clear for a while.


Yeah, my "to do" list has been getting in the way as well now that I'm no longer amongst the infirm. Please don't reconsider polishing, it would only make me look bad :D as I'm not going that far on the cylinders.

Then there is the mill. "Simple!", I thought. Just shim the power x-axis drive bevel gear and I'm on my way. Hah! :problem: Once I pulled it all apart I found the reason why the old drive was probably shot. The installation was done by idiots who had no idea how to make it work properly. The way things were cobbled together there is no way to adjust the bevel gear to the proper lash. Long story short, I'm having to redo the whole setup. Probably an afternoon's work but tough to get that much time all in one go. As long as nothing else falls in to my lap, and I don't have to order any parts or materials, I should be able to get it done over the next couple of days. "The best laid plans...", right? ;)

-Ron
Wells-Index 860 Mill
South Bend 11" Lathe
Queen City Shaper
User avatar
ScrapMetal
Site Admin
 
Posts: 225
Joined: Thu Feb 02, 2012 3:39 am

Re: Where are we at?

Postby ScrapMetal » Fri Nov 16, 2012 3:13 pm

Well, I ignored everything at the office yesterday and spent the afternoon out working on the mill. Using the materials that were with the original "install" (never worked right - I'd like to kick the previous owner) as well as cutting a new bearing and a bushing (love my lathe :mrgreen: ) I was finally able to get the gear lash set within a reasonable proximity of what it is supposed to be. Bottom line, I have my mill back together and functional.

I should be set to put some holes in some cylinders this weekend between making it to a local gun show, my son having a basketball game and whatever else my wife can come up with or dire emergencies around the office.... You get the idea. ;)

I'll post pics if I do make any holes.

-Ron
Wells-Index 860 Mill
South Bend 11" Lathe
Queen City Shaper
User avatar
ScrapMetal
Site Admin
 
Posts: 225
Joined: Thu Feb 02, 2012 3:39 am

Re: Where are we at?

Postby ScrapMetal » Fri Nov 23, 2012 5:03 pm

Progress is progress, right? :eh:

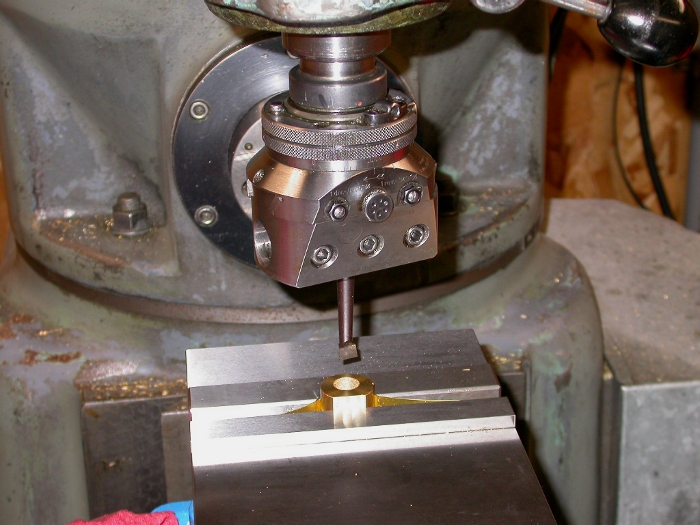
After getting the power feeds on the mill back together I aligned the Kurt vise and installed the "V" groove jaw. I put a micrometer on the "V" to make sure it was perpendicular and it was spot-on. Good stuff!

Once I had given it some thought (not like I didn't have enough time :roll: ) I decided to use a Starrett edge finder to roughly get the cylinder centered on the quill. I used the hole left by the center drill/live center when I turned them on the lathe. [Side note: Feel free to enlighten me as I haven't read it anywhere but, is the purpose of the pointed end on the edge finder used to align the quill on a punch mark?] I then went back and used an indicator on the Indicol system to ensure that the cylinder was properly centered.
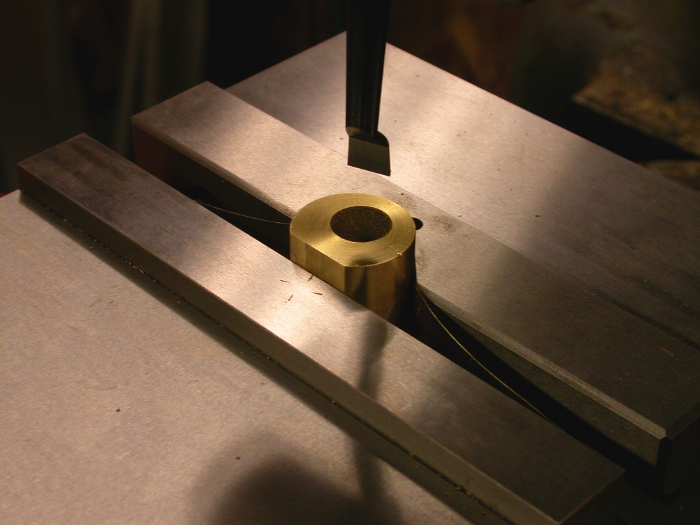
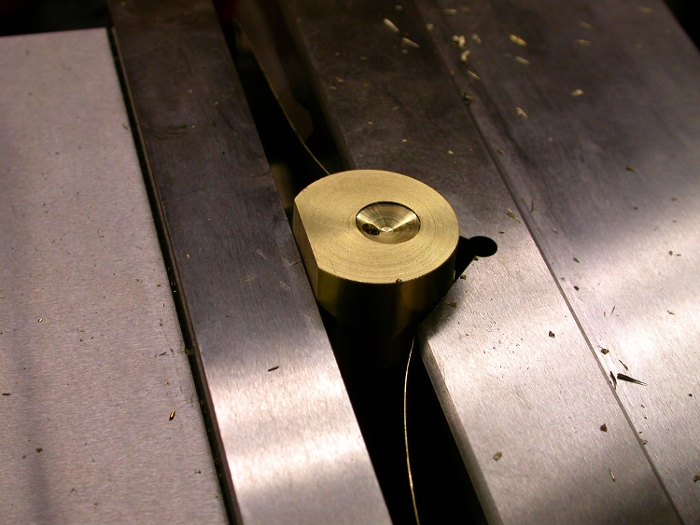
I had some extra brass shim material sitting around that I slipped in to keep the cylinders from being scored by the sides of the "V".

Image

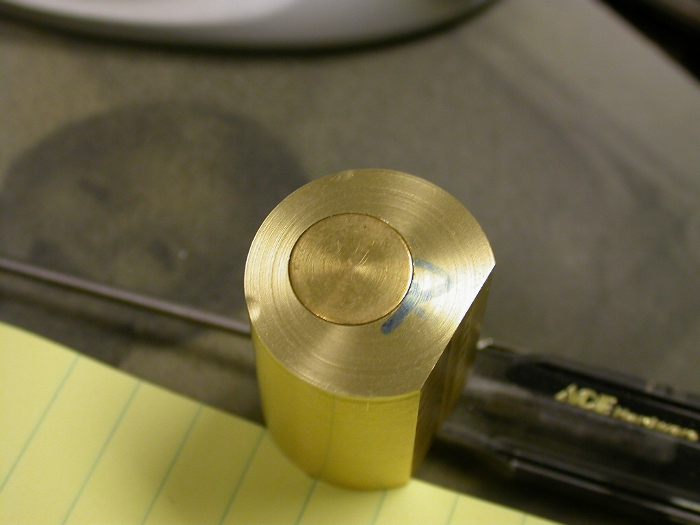
I followed that up with a nice new carbide center drill. I then sacrificed an old 1/8" drill bit and ground it's cutting edges down to 0 degrees so it wouldn't bite into the brass and pull the bit out of the chuck. To keep things as rigid as possible I locked the quill on the mill and raised the knee to drill out the pilot hole. Lots of cranking going on. ;) 
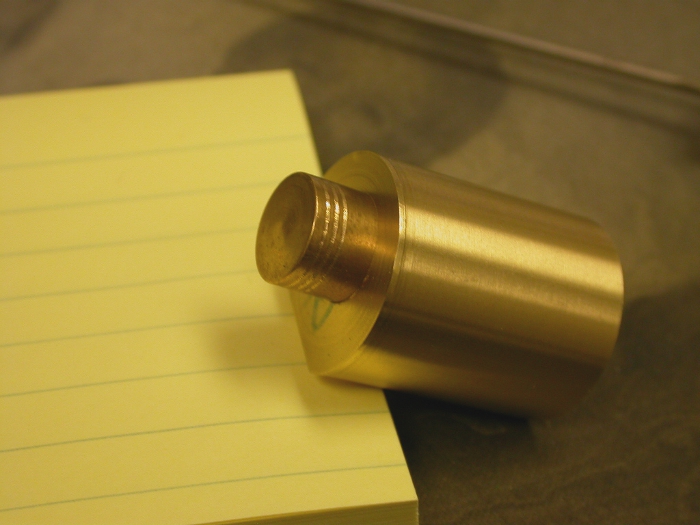
The "hole within a hole" that you see is still the leftover from the lathe center as the pic I took of the pilot hole didn't come out well enough to publish.

Image

It's at this point that I came to an abrupt halt as I had neither an old (still decent) 3/8" or 5/16" drill bit to re-purpose for brass. I'll have to see what I've got around the house once I get back there this evening.

It may not seem like I did a whole lot but I did run into a nasty little issue that slowed me down for a bit.

I had recently bought a cheap set of R8 collets of unknown asian manufacture. Overall they don't look too bad but I still should have been a bit more careful. The first couple of them I put in the quill using the power draw bar went just fine but I grabbed one I hadn't used before, did a quick visual inspection of the threads and hit the button to screw it in. It went in about 1/4" and locked up tight. I ended up using an adjustable crescent wrench as kind of a "pickle fork" and with the light application of a dead-blow hammer finally was able to get it out of the quill. Looking at the aftermath I could see that the threads were less than ideal and had some rust built up in them just below the 1/4" mark. Once the "primal rage" died down a bit I got out my tap set, figured out the threads, and tapped the collet out properly. On subsequent tries the collet loaded up as slick as could be.

I have another gun show to hit this weekend but I expect I'll be back in the shop and maybe even get a cylinder or two turned out.

Regards,

-Ron
Wells-Index 860 Mill
South Bend 11" Lathe
Queen City Shaper
User avatar
ScrapMetal
Site Admin
 
Posts: 225
Joined: Thu Feb 02, 2012 3:39 am

Re: Where are we at?

Postby ScrapMetal » Wed Nov 28, 2012 3:49 pm

Well, I hope you guys are still watching this from time to time as I have a couple of questions on the cylinders.

I am testing everything out on "my" cylinder so I hopefully will keep the mistakes "in house". ;)

To start with, I ended up buying a set of drill bits from Horror Freight (135 degree, split point, cobalt) to "re-purpose" into bits I for drilling into brass. I select a 7/8" bit, filed the cutting edge down to 0 degrees (or 90 depending how you look at it), threw it into a collet, and made a hole. Everything looked like it went well until I had my boring head set up...

Image

When I started to bore out the cylinder I found that the boring head was not on the same "center" Y-axis as the drill bit even though I had never moved the table. Fortunately I had left enough extra material so that it became irrelevant as I increased the bore. Once the boring was done and I had the cylinder out of the vise my measurements showed that the bored hole was very straight telling me that the head was trammed properly. I don't quite understand why the drill bit was "off".

The next issue I had was chatter. I first started boring at about 200 rpm (~0.5" hole) and there was some chatter but the bore had visible lines in. I bumped the speed up to 1600 rpm and had much smaller chatter marks with no lines. The final cut I made was at 600 rpm and I could hear the chatter even with the very, very light cut. The result is a bore that isn't real smooth but I think some emory cloth and some handwork will get it to where I want it to be. I tried boring while using cutting fluid as well as dry with pretty much the same results. I also did the boring by locking the quill and raising the table to keep the setup as rigid as possible. Any suggestions or things I'm missing?

Image

Now, here's the big question. How much/close do you guys want me to bore these things out? Do you want a slip fit with a slightly rough cylinder so that once it's polished it's even looser or do you want it to "not quite fit in" so that you can do the extra finish work to get it to slip in?

Here's the one that I just did for myself...


Image


Image

Sorry for the crummy pics (especially the last one) my camera's battery was dying and I was in a rush to take it before it went bye-bye. :problem:

-Ron
Wells-Index 860 Mill
South Bend 11" Lathe
Queen City Shaper
User avatar
ScrapMetal
Site Admin
 
Posts: 225
Joined: Thu Feb 02, 2012 3:39 am

Re: Where are we at?

Postby Hawkeye » Wed Nov 28, 2012 8:33 pm

Ron,

I'm thinking the offset between drill and boring head may be due to the bit being ground ever so slightly asymmetrical. If one cutting edge is a bit longer than the other one, it will drill a slightly larger hole than measured bit diameter. It makes sense that it could start the hole a bit off centre as well. Once it starts off to one side, it would tend to follow that line.

Good questions on the bore size. On one hand, each builder could play with technique and fit, to learn a few things. On the other foot, we might not be able to match your alignment when we set up. In that case, it might be better to drill the holes about 5 thou (or even 1/64") under, so that we have a bit of meat to correct our setup errors.

Just something to get the discussion going.
Mike
User avatar
Hawkeye
 
Posts: 44
Joined: Sun Feb 05, 2012 10:04 pm
Location: Kelowna, BC, Canada

Re: Where are we at?

Postby ScrapMetal » Fri Nov 30, 2012 2:02 am

You're right, the alignment was the main thing I was concerned with. Depending on everyone's setups it could be a royal p.i.t.a. to get it indexed back in on their setups. Now, if I leave just a couple of thousandths short of a "fit" you don't think that would be too much to remove by hand with say emory cloth, without making the bore inconsistent? From the work I've seen from you guys I'm pretty sure most of you have more experience and will do a better job of this than I. I just want to make this the easiest for everyone.

I am planning to have the cylinders done by the end of the weekend. So far, the wife hasn't told me of anything on my "calendar". :roll:

As soon as rleete is able to get the caps to me I'll be ready to start shipping the "kits" out to everyone. :hsmiley:

Thanks,

-Ron
Wells-Index 860 Mill
South Bend 11" Lathe
Queen City Shaper
User avatar
ScrapMetal
Site Admin
 
Posts: 225
Joined: Thu Feb 02, 2012 3:39 am

Re: Where are we at?

Postby Hawkeye » Fri Nov 30, 2012 6:27 pm

How many more bearings do you need?
Mike
User avatar
Hawkeye
 
Posts: 44
Joined: Sun Feb 05, 2012 10:04 pm
Location: Kelowna, BC, Canada

Re: Where are we at?

Postby rleete » Sun Dec 02, 2012 3:46 pm

ScrapMetal wrote:As soon as rleete is able to get the caps to me I'll be ready to start shipping the "kits" out to everyone. :hsmiley:


Extraordinarily bad timing; I leave for Disney World tomorrow morning.
No, the caps are not done. No, I will not be working on them tonight.
11 days off work, and 8 of them will be down in the land of giant mice.


As a bit of an apology, I will post the link to what took it's place in the shop recently:

http://www.machinistblog.com/wrenchhamm ... mini-mill/
Homier Speedway 7x14 lathe
Grizzly G8689 Mini Mill
HF 4x6 Bandsaw, bench grinder and more
Years of experience wrecking things
rleete
 
Posts: 62
Joined: Thu Feb 02, 2012 5:22 am
Location: Rochester, NY

Re: Where are we at?

Postby Hawkeye » Sun Dec 02, 2012 4:43 pm

Doggone it, Roger. You made me go and add that hammer to my project list. Since I'm going CNC with the X2, it makes more sense now than ever. I also added the column-stiffening plate.

Nice hammer. :thumbup:
Mike
User avatar
Hawkeye
 
Posts: 44
Joined: Sun Feb 05, 2012 10:04 pm
Location: Kelowna, BC, Canada

Re: Where are we at?

Postby ScrapMetal » Thu Dec 06, 2012 4:26 pm

First of all - I am an idiot!

I have finally gotten around to drilling out the cylinders. It turned out that my weekend and last few days were pretty packed but more on that below. Anyway, I had set things up in a "production" mode where I spotted all the cylinders, drilled pilot holes, and then drilled the "major" holes. By the way, that's a lot of cranking on the Z-axis, I really need a power feed for that. ;) The final hole was drilled and I had just installed the boring head in the quill. I made some final adjustments to the boring head, without looking (It had become so "automatic" ) reached down and started to crank on the "Z-axis". I immediately realized my mistake as I had grabbed the Y-axis crank instead. I had maybe turned one and a half or two turns but the "damage" was done. Granted, I know that's pretty minor and easily rectified (only have to indicate on Y-axis) but it messes with my head when I do something so thoughtless. It was getting late so I walked away and sat down to post this. I'll go back to finish up tomorrow when I'm "fresh". :eh: :D


Hawkeye wrote:How many more bearings do you need?


Sorry to say that I don't know yet as I haven't had time to look at what I've got. Lame excuse, I know. I would guess that I would need one as I seem to remember seeing six but I will check and let you know for sure. Thanks.


Wife had all kinds of stuff for me over the weekend and the last few days were "follow up" doctor appointments that I hadn't realized it was time for (without my wife I might as well be a tree stump). Since we all like pics I had one of the docs print out my x-rays so I can show you guys what has slowed me down as of late. I just wish I hadn't had to be on the receiving end of this little machining project...

Image

Given my nature it probably wasn't best that I see these images. It's going to bug me for quite a while that the plate wasn't properly centered on my spine. :oops: There's just no pride in workmanship these days. :roll: :D

Image

-Ron
Wells-Index 860 Mill
South Bend 11" Lathe
Queen City Shaper
User avatar
ScrapMetal
Site Admin
 
Posts: 225
Joined: Thu Feb 02, 2012 3:39 am

PreviousNext

Return to SOSE Build progress

Who is online

Users browsing this forum: No registered users and 2 guests

cron