Where are we at?
Re: Where are we at?
![]() by rleete » Thu Sep 06, 2012 11:17 am
by rleete » Thu Sep 06, 2012 11:17 am
Did I post that already? Old age and multiple forums; I sometimes forget.
Homier Speedway 7x14 lathe
Grizzly G8689 Mini Mill
HF 4x6 Bandsaw, bench grinder and more
Years of experience wrecking things
Grizzly G8689 Mini Mill
HF 4x6 Bandsaw, bench grinder and more
Years of experience wrecking things
- rleete
- Posts: 62
- Joined: Thu Feb 02, 2012 5:22 am
- Location: Rochester, NY
Re: Where are we at?
![]() by ScrapMetal » Thu Sep 06, 2012 2:33 pm
by ScrapMetal » Thu Sep 06, 2012 2:33 pm
rleete wrote:Okay, lets' see if this works. Pics, just for you Ron. And I'll type slow, because I know you can't read fast...
I needed to make cylinder caps. Thin round wafers, hard to hold. So, I parted off oversize, about 10 pieces. Then I made an adapter/collet to hold them. It goes as follows:...
Very nice - work, method, and write up! (I got some help with the bigger words.
Turbinedoctor wrote:Ron that is a nice finish on the parting off. I tried parting off with the live center in place and had too much pressure on it and everything got jambed up. Didn't know my lathe could make a noise like that. Still need to practice more with parting off.
Durwood
Thanks much, although I admit I surprised myself with as well as it turned out. I've read many accolades of the carbide insert parting blades and figured it would be worth a try. So far it seems to be money well spent. It also didn't hurt to tighten down everything I could, double check that everything was square, and use the live center/tailstock to help steady the work.
-Ron
Wells-Index 860 Mill
South Bend 11" Lathe
Queen City Shaper
South Bend 11" Lathe
Queen City Shaper
-

ScrapMetal - Site Admin
- Posts: 225
- Joined: Thu Feb 02, 2012 3:39 am
Re: Where are we at?
![]() by ScrapMetal » Wed Sep 12, 2012 3:20 pm
by ScrapMetal » Wed Sep 12, 2012 3:20 pm
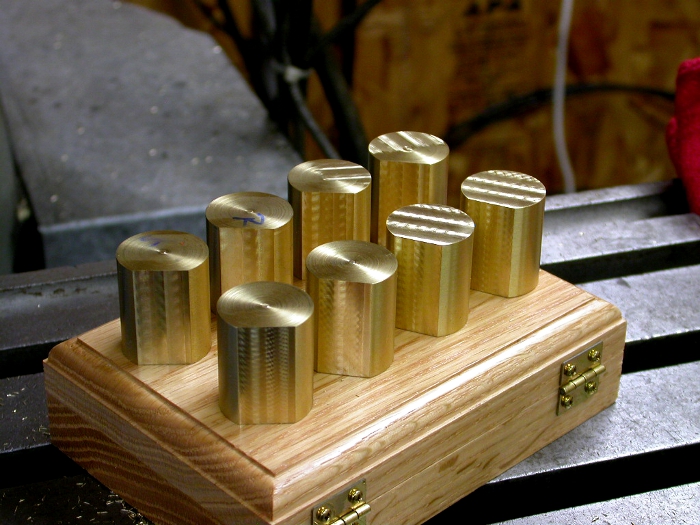
Reached another micro-milestone today! 
Nothing major but it is a step in the right direction - the cylinders are all turned and parted off:

Before anyone says it, "Yes, the parting bit is on center." I double-triple-checked. I believe the reason I'm getting a "stem" is due to a number of things. I am using a fairly wide "neutral" cutting insert instead of one angled to the left or right. The tailstock is being used with a live center to further stabilize the piece which I'm sure provides a little extra stress on the "stem" when the cutting diameter gets so small. Just my guess.
Now, to proceed from here I'm thinking that I will mill the one side of the cylinders flat so that I can get a better grip on them when I go to drill. I have basically three choices on the drilling and I haven't decided/figured which would be the best way to go. I can "drill" them on the mill and while they are still in the vise, hit them with a boring bar/head to take them near/at size. Set up would be fairly simple and lining it up on the X-Y of the mill would be a breeze but I haven't used the mill for "drilling" especially a 1/2" bore in a small piece of brass. The same thing can be done with the lathe where I'm more familiar with drilling in brass and a much simpler boring setup. The initial set up in the chuck would be a bit of a pain in the rear trying to center/offset the piece in the chuck accurately. The third way is probably the least likely and that's using the drill press. I don't trust the press or the vise and after drilling I'd then have to do an extra setup when I went to the lathe or mill to finish boring them out. I think we can throw out the drill press as an option (Kind of ironic that the least able tool to drill holes is the one designed for it. )
)
Any comments or suggestions?
Thanks guys,
-Ron
Nothing major but it is a step in the right direction - the cylinders are all turned and parted off:
Before anyone says it, "Yes, the parting bit is on center." I double-triple-checked. I believe the reason I'm getting a "stem" is due to a number of things. I am using a fairly wide "neutral" cutting insert instead of one angled to the left or right. The tailstock is being used with a live center to further stabilize the piece which I'm sure provides a little extra stress on the "stem" when the cutting diameter gets so small. Just my guess.
Now, to proceed from here I'm thinking that I will mill the one side of the cylinders flat so that I can get a better grip on them when I go to drill. I have basically three choices on the drilling and I haven't decided/figured which would be the best way to go. I can "drill" them on the mill and while they are still in the vise, hit them with a boring bar/head to take them near/at size. Set up would be fairly simple and lining it up on the X-Y of the mill would be a breeze but I haven't used the mill for "drilling" especially a 1/2" bore in a small piece of brass. The same thing can be done with the lathe where I'm more familiar with drilling in brass and a much simpler boring setup. The initial set up in the chuck would be a bit of a pain in the rear trying to center/offset the piece in the chuck accurately. The third way is probably the least likely and that's using the drill press. I don't trust the press or the vise and after drilling I'd then have to do an extra setup when I went to the lathe or mill to finish boring them out. I think we can throw out the drill press as an option (Kind of ironic that the least able tool to drill holes is the one designed for it.
Any comments or suggestions?
Thanks guys,
-Ron
Wells-Index 860 Mill
South Bend 11" Lathe
Queen City Shaper
South Bend 11" Lathe
Queen City Shaper
-
ScrapMetal - Site Admin
- Posts: 225
- Joined: Thu Feb 02, 2012 3:39 am
Re: Where are we at?
![]() by B34VD » Wed Sep 12, 2012 5:01 pm
by B34VD » Wed Sep 12, 2012 5:01 pm
You need to drill the bore offset from center? Coat one end with layout ink and measure from the outside edge and scribe and center punch where you want to bore.
Using your drill press, spot drill the center mark. Then using your 4 jaw chuck with a parallel across the face, place the cylinder againts the parallel and use the center on your tailstock in the spot drilled hole to locate it in the jaws. You will be real close and can indicate it closer if need be.
Using your drill press, spot drill the center mark. Then using your 4 jaw chuck with a parallel across the face, place the cylinder againts the parallel and use the center on your tailstock in the spot drilled hole to locate it in the jaws. You will be real close and can indicate it closer if need be.
- B34VD
- Posts: 26
- Joined: Sun Feb 19, 2012 3:54 am
Re: Where are we at?
![]() by rleete » Wed Sep 12, 2012 8:18 pm
by rleete » Wed Sep 12, 2012 8:18 pm
The way I've done it is to set up a piece in the mill vise. Set up a stop so you can locate successive pieces the same. Zero the mill, and step drill up to about 7/16. Bore or ream it out to size. Swap parts, and do it again. And again, etc. If you have a 1/2" reamer, that should do just fine.
Remember, a straight bore is most important. Size is secondary, as these thing will run even if loose. They just leak a little. But a non-straight bore is a killer. Having one off kilter (crooked) only affects looks (to those that can even see it).
Remember, a straight bore is most important. Size is secondary, as these thing will run even if loose. They just leak a little. But a non-straight bore is a killer. Having one off kilter (crooked) only affects looks (to those that can even see it).
Homier Speedway 7x14 lathe
Grizzly G8689 Mini Mill
HF 4x6 Bandsaw, bench grinder and more
Years of experience wrecking things
Grizzly G8689 Mini Mill
HF 4x6 Bandsaw, bench grinder and more
Years of experience wrecking things
- rleete
- Posts: 62
- Joined: Thu Feb 02, 2012 5:22 am
- Location: Rochester, NY
Re: Where are we at?
![]() by ScrapMetal » Thu Sep 13, 2012 12:09 am
by ScrapMetal » Thu Sep 13, 2012 12:09 am
B34VD wrote:You need to drill the bore offset from center? Coat one end with layout ink and measure from the outside edge and scribe and center punch where you want to bore.
Using your drill press, spot drill the center mark. Then using your 4 jaw chuck with a parallel across the face, place the cylinder againts the parallel and use the center on your tailstock in the spot drilled hole to locate it in the jaws. You will be real close and can indicate it closer if need be.
That's certainly quicker than the different scenarios I was thinking of. That may come in real handy. (FWIW - Yep, they need to be bored offset. See below)
Thanks!
rleete wrote:The way I've done it is to set up a piece in the mill vise. Set up a stop so you can locate successive pieces the same. Zero the mill, and step drill up to about 7/16. Bore or ream it out to size. Swap parts, and do it again. And again, etc. If you have a 1/2" reamer, that should do just fine.
Remember, a straight bore is most important. Size is secondary, as these thing will run even if loose. They just leak a little. But a non-straight bore is a killer. Having one off kilter (crooked) only affects looks (to those that can even see it).
That's pretty much why I ruled out my drill press. I just don't have faith in it or the vise on it. Now that I've gotten good advice and methods for both machines I'll have to do some serious thinking about which I would be least likely to screw up on.

Just as a "refresher" here is the part I'm working on and what they are supposed to look like when done -
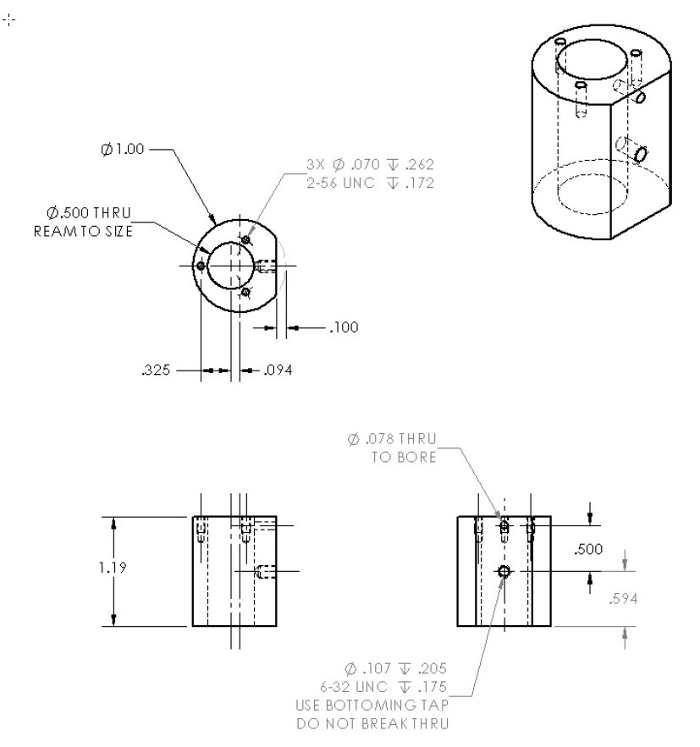
I'm not planning on finishing them completely in that I won't be drilling out the holes for the cap screws or the intake/exhaust hole. I figure you guys can do that much better than I.
Thanks again guys,
-Ron
Wells-Index 860 Mill
South Bend 11" Lathe
Queen City Shaper
South Bend 11" Lathe
Queen City Shaper
-
ScrapMetal - Site Admin
- Posts: 225
- Joined: Thu Feb 02, 2012 3:39 am
Re: Where are we at?
![]() by Turbinedoctor » Sat Sep 15, 2012 5:32 am
by Turbinedoctor » Sat Sep 15, 2012 5:32 am
If it were me I would consider like you said with milling the flat on the side of the cylinder and then stand it up with the flat against the fixed jaw. Use a stop on one side of the vise jaws for another fixed point and put the cylinder into this corner. Locate your spindle to be zero where the hole is to be and then drill or bore to depth. If all the cylinders OD and Flats are the same you should be able to remove one and install another with out any more tweaking, just drill or bore to depth.
That may not work but it is what I would try.
Durwood
That may not work but it is what I would try.
Durwood
Durwood
- Turbinedoctor
- Posts: 65
- Joined: Thu Feb 02, 2012 5:33 am
Re: Where are we at?
![]() by ScrapMetal » Sun Sep 16, 2012 8:58 pm
by ScrapMetal » Sun Sep 16, 2012 8:58 pm
I haven't gotten to the drilling/boring as of yet but at least this afternoon I was able to get my mill trammed. Once it was finished it would have been a shame not to try it out so...
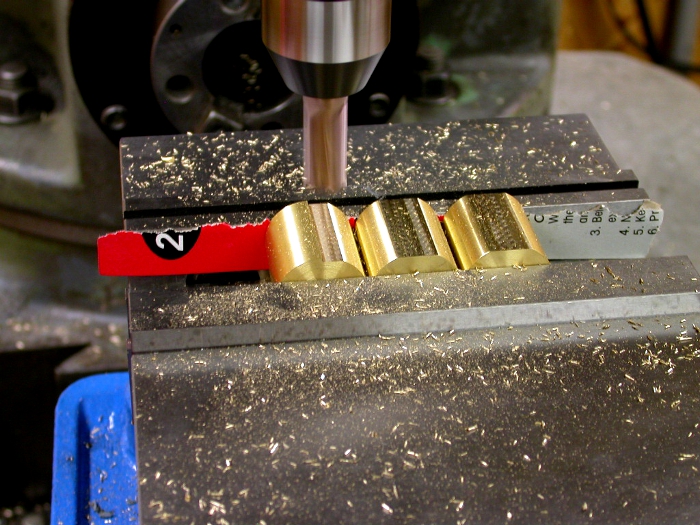
Before I got to that point I used the mill to "shave" off the "stems" as well as took a couple of thousandths off of two that were parted a bit tall. I was a bit surprised when the mill "brushed" the top of a couple of the cylinders but, after inspection, I found that I hadn't used a file on the edges where the parting caused them to be a bit "proud". When tapping them down on to the parallels some slight material must have put them a bit off. It will be easy to polish out as it was more of a "brushing" than it was a cut. Here's where they are at now...
Only thing left is the drilling and boring (as long as I don't screw something up )
)
-Ron
Before I got to that point I used the mill to "shave" off the "stems" as well as took a couple of thousandths off of two that were parted a bit tall. I was a bit surprised when the mill "brushed" the top of a couple of the cylinders but, after inspection, I found that I hadn't used a file on the edges where the parting caused them to be a bit "proud". When tapping them down on to the parallels some slight material must have put them a bit off. It will be easy to polish out as it was more of a "brushing" than it was a cut. Here's where they are at now...
Only thing left is the drilling and boring (as long as I don't screw something up
-Ron
Wells-Index 860 Mill
South Bend 11" Lathe
Queen City Shaper
South Bend 11" Lathe
Queen City Shaper
-
ScrapMetal - Site Admin
- Posts: 225
- Joined: Thu Feb 02, 2012 3:39 am
Re: Where are we at?
![]() by ScrapMetal » Tue Sep 18, 2012 2:57 pm
by ScrapMetal » Tue Sep 18, 2012 2:57 pm
Thanks Durwood. Let's hope that I don't bugger anything up in the next phase. 
Here's what I have in mind - First of all I will replace one of the jaws in the Kurt vise with a jaw that has a vertical "V" cut in to it. I will insert the cylinder with a vertical orientation, it's flat side to the opposite "flat" jaw. (I still need to figure out what I can use in the way of "parallels to get the bottom of the cylinder away from the vise else I will end up drilling into the parallel or the vise.) Once that's in place I will use a dial indicator and a Noga flex-arm installed in the quill to center the piece in the X-axis. I'll then swap out the flex-arm for an edge finder to determine either the flat or round edge in the Y-axis. Using a plunger dial indicator I will then position the quill over the correct spot in the Y-axis. (Here's where I REALLY need to get a DRO on this thing! ) I'll then install a drill bit (one that has been modified for brass) in an R8 collet and drill a hole out to 3/8". I'll then "experiment" with my cylinder to see if I can bore it out accurately enough to mate the cylinders with each piston.
That sound okay? I'll be sure to take some pics.
-Ron
Here's what I have in mind - First of all I will replace one of the jaws in the Kurt vise with a jaw that has a vertical "V" cut in to it. I will insert the cylinder with a vertical orientation, it's flat side to the opposite "flat" jaw. (I still need to figure out what I can use in the way of "parallels to get the bottom of the cylinder away from the vise else I will end up drilling into the parallel or the vise.) Once that's in place I will use a dial indicator and a Noga flex-arm installed in the quill to center the piece in the X-axis. I'll then swap out the flex-arm for an edge finder to determine either the flat or round edge in the Y-axis. Using a plunger dial indicator I will then position the quill over the correct spot in the Y-axis. (Here's where I REALLY need to get a DRO on this thing!
) I'll then install a drill bit (one that has been modified for brass) in an R8 collet and drill a hole out to 3/8". I'll then "experiment" with my cylinder to see if I can bore it out accurately enough to mate the cylinders with each piston.That sound okay? I'll be sure to take some pics.
-Ron
Wells-Index 860 Mill
South Bend 11" Lathe
Queen City Shaper
South Bend 11" Lathe
Queen City Shaper
-
ScrapMetal - Site Admin
- Posts: 225
- Joined: Thu Feb 02, 2012 3:39 am
Who is online
Users browsing this forum: No registered users and 4 guests